Reference of custom attribute value and nesting of HTML elements - Cape.JS Primer
On the previous lecture, we made the easy application displaying “Hello, world!” on the browser as an introducing of Cape.JS.
This time, I explain two more things. The one is the way of replacing a part of “world” with an attribute value of HTML element. And the another one is the way to nest the HTML element.
Well, let’s begin. First, open the file hello_message1.html that you made on the previous lecture by your editor and change the name to hello_message2.html. Then, change the content of <body> element to following.
  <div id="main" data-name="world"></div>
  <script>
    var HelloMessage = Cape.createComponentClass({
      render: function(m) {
        m.p('Hello, ' + this.root.data.name + '!');
      }
    });

    var component = new HelloMessage();
    component.mount('main');
  </script>
Open this file on the browser. “Hello, world!” is supposed to be displayed on the upper left of the screen like the precious time.
In case of this example, it embeds the component HelloMessage to virtual DOM tree by acquiring data-name attribute value from the HTML element mounted. It’s this.root within the component’s method render and the HTML element mounted can be referenced. Its data property returns hash holding the custom data attribute (the attribute with name started from data-) name and value of HTML5.
The HTML element mounted to is <div> element holding id of main. It has the custom data attribute data-name="world". You can acquire its data "world" from this.root.data.name. So,
m.p('Hello, ' + this.root.data.name + '!');
The character string “Hello, world!” is displayed on the browser when you write like above.
Let’s try to change the element value to “ruby” and save it and reload the browser. The screen display will change to “Hello, ruby!”.
Next, I’ll explain about nesting of HTML elements.
Change the name of file you made just before hello_message2.html to hello_message3.html and save it and add lines at the end of the element <head>.
<link rel="stylesheet"
  href="https://maxcdn.bootstrapcdn.com/bootstrap/3.3.4/css/bootstrap.min.css">
Bootstrap imports the CSS file.
And, change the content of the element <body> to following.
  <div id="main" data-name="world"></div>
  <script>
    var HelloMessage = Cape.createComponentClass({
      render: function(m) {
        m.div({ class: 'container' }, function(m) {
          m.h1('Greetings from Cape.JS');
          m.div({ class: 'panel panel-default' }, function(m) {
            m.div('Hello, ' + this.root.data.name + '!',
              { class: 'panel-body' });
          });
        });
      }
    });

    var component = new HelloMessage();
    component.mount('main');
  </script>
The screen display is supposed to be like following when you open this file on your browser.
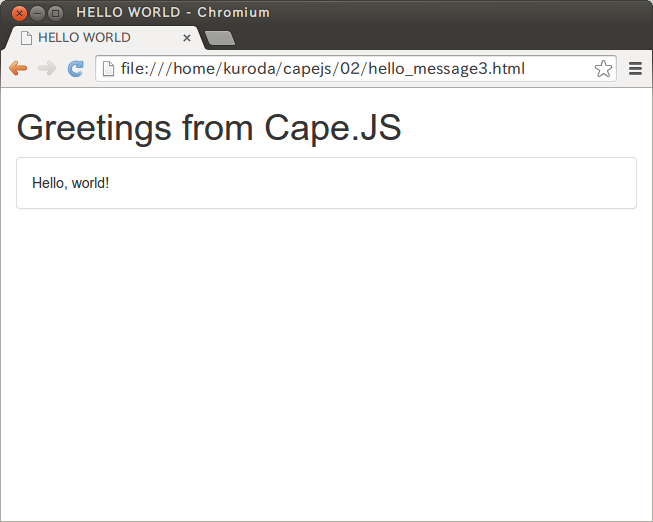
In the case of this example, it runs nesting of the HTML element by specifying the unnamed function to parameter at the end of the method. The following below shows a part of HTML documents created by the code above.:
<div class="container">
  <h1>Greetings from Cape.JS</h1>
  <div class="panel panel-default">
    <div class="panel-body">Hello, world!</div>
  </div>
</div>
The unnamed function that is specified as the parameter at the end of the method acquires one parameter (m). This parameter is markup builder (the object to make virtual DOM tree) that I explained on the previous. The HTML element added into the virtual DOM tree within the unnamed function becomes child elements of the HTML element introducing the unnamed function.
In the case above, the unnamed function is called again within it. That means that runs 2-level nesting. In the result, the element <div> in the most inner part is the “grandchild” element of the element <div> in the outer part.
That’s all for today. On the next lecture, I’ll explain the method text() and the option innerHTML.