Creating the text nodes
Follow through on the previous lecture, I’ll introduce the basic functions of Cape.JS.
The theme of this lecture is texts. I’ll explain 2 cases. The one is that you escape and embed the specified character string and the another case that you don’t.
Before going into the main point, let’s separate off the JavaScript programming that defines the component class of Cape.JS from the HTML file. It’s easier to handle when the programming becomes longer.
Exact the part defining the class HelloMessage within the element <script> of hello_message3.html that you made at the end of the previous lecture and create a new file hello_message4.js.
var HelloMessage = Cape.createComponentClass({
  render: function(m) {
    m.div({ class: 'container' }, function(m) {
      m.h1('Greetings from Cape.JS');
      m.div({ class: 'panel panel-default' }, function(m) {
        m.div('Hello, ' + this.root.data.name + '!',
          { class: 'panel-body' });
      });
    });
  }
});
Then rename hello_message3.html to hello_message4.html and change the content of the element <body> to like following.
  <div id="main" data-name="world"></div>
  <script src="./hello_message4.js"></script>
  <script>
    var component = new HelloMessage();
    component.mount('main');
  </script>
Just to make sure, open the file hello_message4.html on the browser and make sure that the screen display is same like the previous.
The goal of this lecture is to make “world!” of “Hello, world!” bold by surrounding with <strong> and </strong>. Rewrite hello_message4.js like following.
var HelloMessage = Cape.createComponentClass({
  render: function(m) {
    m.div({ class: 'container' }, function(m) {
      m.h1('Greetings from Cape.JS');
      m.div({ class: 'panel panel-default' }, function(m) {
        m.div({ class: 'panel-body' }, function(m) {
          m.text('Hello, ');
          m.strong(this.root.data.name + '!');
        });
      });
    });
  }
});
The screen display is supposed to be like following when you open the file hello_message4.html.:
The methods you have never seen before are text() and strong(). The latter is a method adding the element <strong> into virtual DOM tree and it’s a companion of div() and p(). The method text() adds text nodes (a part which is nor surrounded within the element) into virtual DOM tree.
Another method to add text nodes is sp(). It adds one half-width space into virtual DOM tree. By using this, you can rewrite hello_message4.js to like following.
var HelloMessage = Cape.createComponentClass({
  render: function(m) {
    m.div({ class: 'container' }, function(m) {
      m.h1('Greetings from Cape.JS');
      m.div({ class: 'panel panel-default' }, function(m) {
        m.div({ class: 'panel-body' }, function(m) {
          m.text('Hello,').sp();
          m.strong(this.root.data.name + '!');
        });
      });
    });
  }
});
It’s used for emphasizing the existence of half-width space and inserting a half-width space between the elements.
By the way, the character string embedded by the method text() is escaped. That means, the special character strings like < や & is automatically converted to < and &. This specification is desirable in the terms of security but there are cases that you don’t want to escape. For example, the case that you want to embed the character string by using the entity reference like &x263a;.
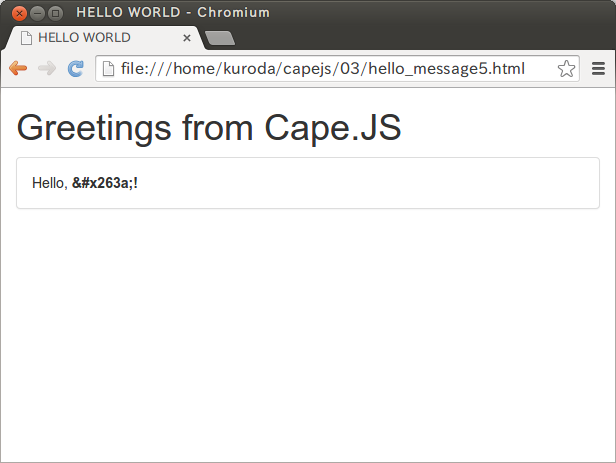
Copy hello_message4.html to hello_message5.html and copy hello_message4.js to hello_message5.js and open hello_message5.html on the editor and rewrite the contents of the element <body> as following.
<div id="main" data-name="&#x263a;"></div>
<script src="./hello_message5.js"></script>
<script>
var component = new HelloMessage();
component.mount('main');
</script>
The screen display is supposed to be like following when you open this file on your browser. :
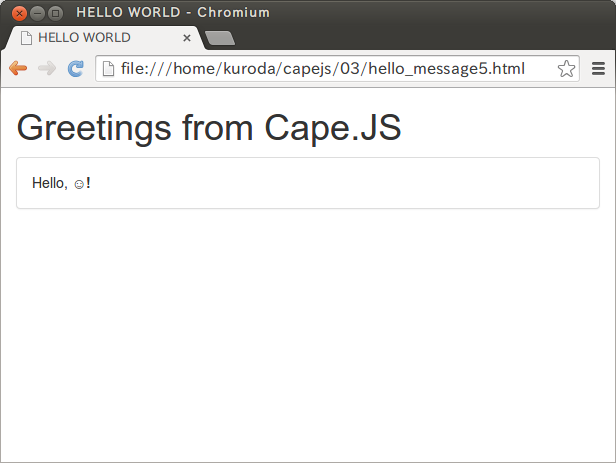
Rewrite hello_message5.js as following not to escape the character string.:
var HelloMessage = Cape.createComponentClass({
  render: function(m) {
    m.div({ class: 'container' }, function(m) {
      m.h1('Greetings from Cape.JS');
      m.div({ class: 'panel panel-default' }, function(m) {
        m.div({ class: 'panel-body' }, function(m) {
          m.text('Hello,').sp();
          m.strong({ innerHTML: this.root.data.name + '!' });
        });
      });
    });
  }
});
The screen display is supposed to be like following when you reload the browser.:
It may difficult to see but “smile mark is displayed on the screen. You can specify the content of the element as “real HTML” by using the option innerHTML like this.
On the next lecture, I’ll explain how to embed Cape.JS to Ruby on Rails.