Initializing the date with ajax - Cape.JS Primer
On the previous lecture, I explained the relation of Cape.JS component and data.
The theme of this lecture is Ajax. I’ll explain how to acquire the initialized data from the database through Rails application’s API and assign to the component.
First, let’s create the table tasks on the database to register tasks of “To-do list”. Run the following command on the terminal.
$ bin/rails g model task
Then, open the file which name ends with _create_tasks.rb at the directory db/migrate/ on the text editor and rewrite as following.
class CreateTasks < ActiveRecord::Migration
  def change
    create_table :tasks do |t|
      t.string :title, null: false
      t.boolean :done, null: false, default: false

      t.timestamps null: false
    end
  end
end
On the table tasks, it has 2 columns oftitle and done. Each type is string type (string) and Boolean type (boolean). It records the title of the task on the column title and records truth-value whether the task is done or not on the column done.
If you run the following command on the terminal, you can create the table tasks.
$ bin/rake db:migrate
The following result is supposed to display on the terminal.
== 20150612081420 CreateTasks: migrating ======================================
-- create_table(:tasks)
   -> 0.0047s
== 20150612081420 CreateTasks: migrated (0.0048s) =============================
We make the script to insert the sheet data (initialized data). Open db/seeds.rb on the text editor and add the following code after deletin all comment lines ( starting from #).
Task.create!(title: 'Buy cat food', done: false)
Task.create!(title: 'To go dentist', done: true)
Task.create!(title: 'Take out the trash', done: false)
Task.create!(title: 'Write blogs', done: false)
Run the following command on the terminal to insert the sheet data.
bin/rake db:seed
The next step is to create API to acquire the list of the task.
Open config/routes.rb on the text editor and rewrite as following.
Rails.application.routes.draw do
  root 'top#index'

  namespace :api do
    resources :tasks, only: [ :index ]
  end
end
As the result, Rails application can receive the access to URL path /api/tasks.
Next, we make controller. Run the following command on the terminal.
bin/rails g controller api/tasks
The file app/controllers/api/tasks_controller.rb is created so rewrite as following on the text editor.
class Api::TasksController < ApplicationController
  def index
    @tasks = Task.order(id: :asc)
  end
end
Then, create a new file index.jbuilder with the content of following at the directory app/views/api/tasks.
json.array! @tasks, :id, :title, :done
We created API. Let’s make sure it works right. Boot Rails application and access to http://localhost:3000/api/tasks on the browser. If the strings like following display, it’s OK.
[{"id":1,"title":"Buy cat food","done":false},{"id":2,"title":"Go dentist","done":true},{"id":3,"title":"Take out the trash ","done":false},{"id":4,"title":"Write blogs","done":false}]
Let’s move on the developing the component side of Cape.JS.
Open app/assets/javascripts/todo_list.es6 on the text editor. The method init() of the class TodoList is now defined like following.
  init() {
    this.tasks = [
      { title: "Buy cat food", done: false },
      { title: "Go dentist", done: true }
    ];
    this.refresh();
  }
Rewrite it to following.
  init() {
    $.ajax({
      type: 'GET',
      url: '/api/tasks'
    }).done(data => {
      this.tasks = data;
      this.refresh();
    });
  }
$.ajax is the method of jQuery. It sets the result to the parameter data by accessing /api/tasks while using the method GET here. It’s the strings that API returns but jQuery automatically changes the array of the object by judging it’s JSON. That means, the array of the object is set to this.tasks if Ajax call successes.
Be careful that there is this.refresh() written within the method done. The rendering of the component isn’t done at the time when the method is run. It’s done when Ajax call is complited. It’s very important to understand the timing of the rendering at the time of programming Cape.JS
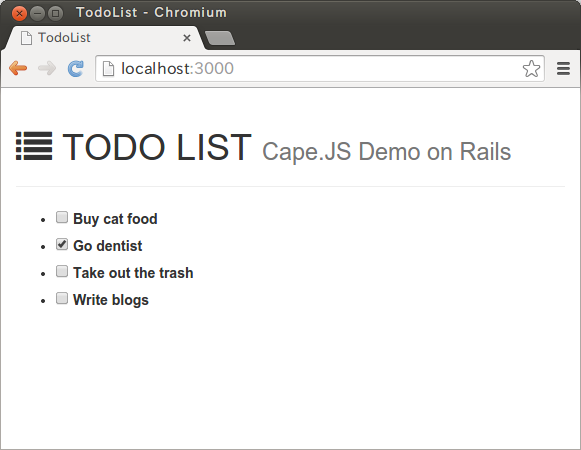
Now, let’s make sure it works weel. Access to http://localhost:3000 on the browser and if the screen displays like following, it successes.

You learn a little bit more this time. Well done!
On the next lecture, I’ll explain how to change the value of the column done by clicking the checkbox in front of the title of each task.